
17 Nov PROJECT MANAGEMENT: 31 BEST TECHNIQUES, PRACTICES AND TOOLS

Project Management: 31 Best Techniques, Practices and Tools
To deliver a successful project, you’ll need to manage it properly — and, the best way to do this is to use the right project management technique for the type of project you’re working on.
In this article, you’ll find out:
- What is project management? (+ some of its crucial elements)
- What are project management techniques?
- When you should use them?
- How you should apply them?
- What are the best 14 project management techniques for different project types?
- What are the best practices and tools you can use to help you in your project work, regardless of the project management technique you use?
To learn all that and more, read on.

Table of Contents
The introduction to project management, its elements, and techniques
In this section, you’ll learn about Project Management, some of its elements, and techniques; when you should use them, and how you can apply them.
What is a project?
To understand what Project Management Techniques are, we’ll first need to understand what constitutes a “Project” and what “Project Management” is.
A Project involves a specific set of operations that an individual or a group of people needs to undertake to reach a predefined goal. Each project has a specific set of requirements you need to fulfill to be able to call it a success.
At the end of the project, you analyze the outcomes. Now, to carry out these analytics, you’ll need to have the right data — for example, you can track the time you spend on the project with a project time tracker and use this data for the analytics.
What is Project Management?
Project Management is the application of your skills, your experience, and the right tools for the purpose of carrying out the specific set of operations needed for you to meet the project’s set of requirements. A typical project timeline in project management involves the following 5 phases of project development:
- Conception and initiation
- Definition and planning
- Launch and execution
- Performance, monitoring, and control
- Closure
💡 To learn about specific project management tools you can implement in your work, check out The definitive guide to the best project management tools
4 Essential elements of Project Management
Apart from the budget, quality, and scope of the project, we want to give special attention to some of the essential elements of project management regardless of the industry or complexity of the project.
1. The Project Charter
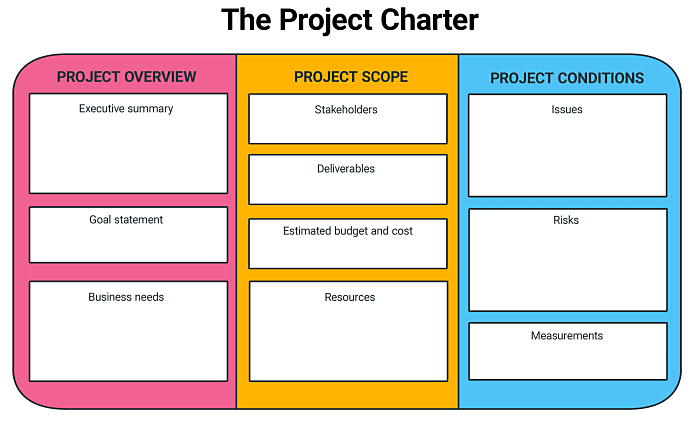
The Project Charter in project management is a concise formal document used for project initiation. The Project Charter lays out the project’s purpose, goals, resources, and stakeholders. It lets your team:
- Define the objective of the project
- Make the measurements & assumptions for the project
- Define the project restrictions
- Define the project scope statement
- Select the project manager authority
- Form the team
The Project Charter is written and provided by the project’s sponsor and delegated to the project manager later on. Fundamentally, every project should have a Project Charter since it serves as the guideline that leads the project towards its goal and success.
In the visual representation below, you can see the Project Charter’s main components that define the project’s goal, identify the stakeholders, cost, risks, and more.
2. Deliverable List and Task List
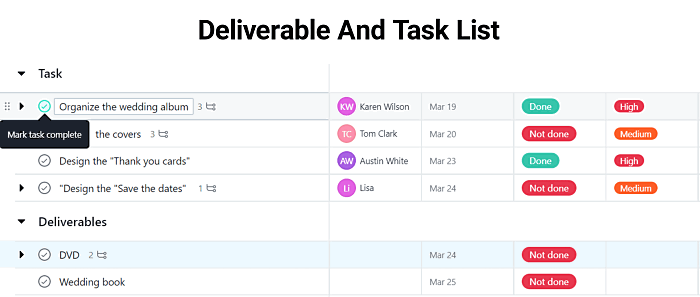
The Deliverable List stands for the final products or services that are achieved upon the completion of a project. Deliverables can be tangible such as, for instance, a computer, or intangible — a computer program.
A task is treated as the lowest level on the list — each task represents an action or step you need to undertake to complete a deliverable or a set of deliverables.
The difference between a Work Breakdown Structure and the Deliverable List and Task List is that the latter strictly define who is responsible for each task. You can even define deadlines for each task or deliverable, to establish more control over your work.
In addition to all that, you can frame your list as a simple checklist and track your progress by checking each task and deliverable once you’re done with it.
3. The Project Schedule
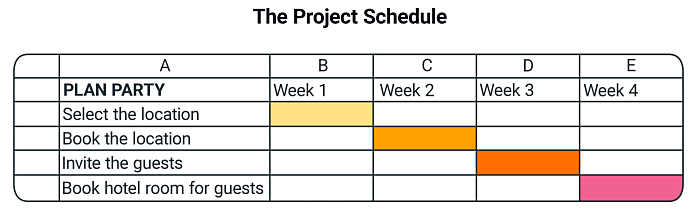
Creating a Project Schedule involves sequencing tasks to be done and allocating them to calendar time slots for a project to be completed. You define tasks, define the resources needed to complete the tasks, assign the tasks to specific team members, and then have tasks allocated to specific time slots in your calendar.
If you have trouble creating an efficient Project Schedule, consider asking yourself the following:
- What needs to be done?
- When?
- Who is responsible for that?
Answering these questions will help you create a task list that will later form a workable project schedule.
Take a look at the Project Schedule visual representation below. You can see that planning a party requires certain task completions, and for each task, there is an allocated specific time slot in the calendar.
4. The Risk Register
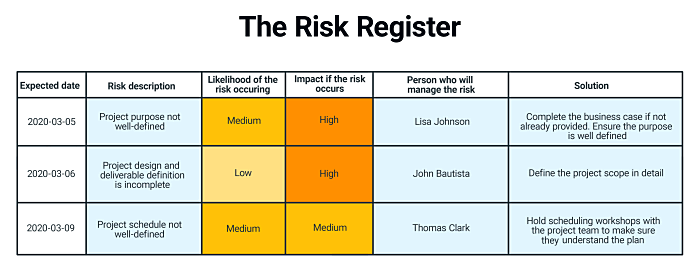
Creating a Risk Register in project management means focusing on the potential problems and challenges you may encounter while working on a project.
These potential problems are also called “negative risks” — they require that you anticipate them, write them down, clarify how serious they are, and then define solutions for them. You’ll also need to clarify who is responsible for implementing these solutions.
Of course, you may also encounter “positive risks” in your work — they are additional “project opportunities” you may want to define as separate projects and tackle separately.
In the table below, you can see examples of certain risks and their risk matrix — the likelihood of project’s risks, levels of their impact, risk management assignees, and possible solutions.
What are Project Management Techniques?
The main difference between project management and project management techniques is specificity. So, a Project Management Technique is the specific approach to applying your skills, your experience, and the right tools to carry out the specific set of operations needed for you to meet the project’s set of requirements.
Now that you understand what project management techniques are and how they relate to projects and project management, let’s see when you should best use them.
When to use Project Management Techniques?
Now, despite a definition that seems to encourage widespread use, there is no real need to use specific project management methodologies for each project.
Sometimes, a straightforward, linear organization of project tasks will do.
However, in other cases, a specific project management technique is the most efficient solution.
Here are 7 project elements that indicate you should use a specific project management technique with your project:
- Higher magnitude of effort — the goal of the project is to create a specific product.
- Higher importance — the project is of high importance to the company.
- Higher risk — the project represents a higher risk to the company due to a larger number of uncertainty factors.
- Lower effectiveness of the current management structure — your current management structure involves projects that miss deadlines, breach their budget, or miss their specific sets of requirements.
- High unfamiliarity — the project is different from “normal”, either in scope or expected work routine.
- High interrelatedness — the project requires tasks to be undertaken simultaneously.
- Impact on organizational reputation or financial situation — the project may result in a severe reputation or money loss if not handled correctly.
All of the listed elements indicate you should select a specific project management technique before diving into work.
How to apply project management techniques?
Your application of a project management technique will depend on the type of project you are working on, as well as the technique you’ve selected to work with.
Now, your best solution to finding a suitable project management technique for your project is to test out and combine several project management techniques. As you advance your work, you’ll likely be able to identify the practices that work for you and your projects, and which don’t.
With that in mind, let’s move on to the list of the best PM techniques and methodologies.
The list of the best project management techniques and methodologies
In this section, you’ll learn about the 14 best project management techniques and methodologies you can use today.
Based on the type of project, we’ll differentiate between 3 types of projects, and sort the project management techniques based on whether they are best for:
- Simple projects
- Complex projects
- Software engineering projects
Of course, some of these types of PM methodologies may overlap — you may be able to use some simple and complex project management techniques for your software engineering, depending on what you’re looking to achieve.
There are numerous project management techniques indeed, whether they are used for certain industries, or based on the complexity of the project. However, there are project management techniques that every project manager should know to lead their projects to success.
So, let’s start with them.
Top 3 project management techniques every project manager should know
These are our picks:
- The Classic Project Management Technique
- Kanban Project Management Methodology
- Program Evaluation and Review Technique (PERT)
Try using these techniques to improve your knowledge and achieve amazing results in the field of project management.
1. The Classic Project Management Technique
This is a traditional project management technique that is one of the simplest and most appropriate for running projects.
What is the Classic Project Management technique?
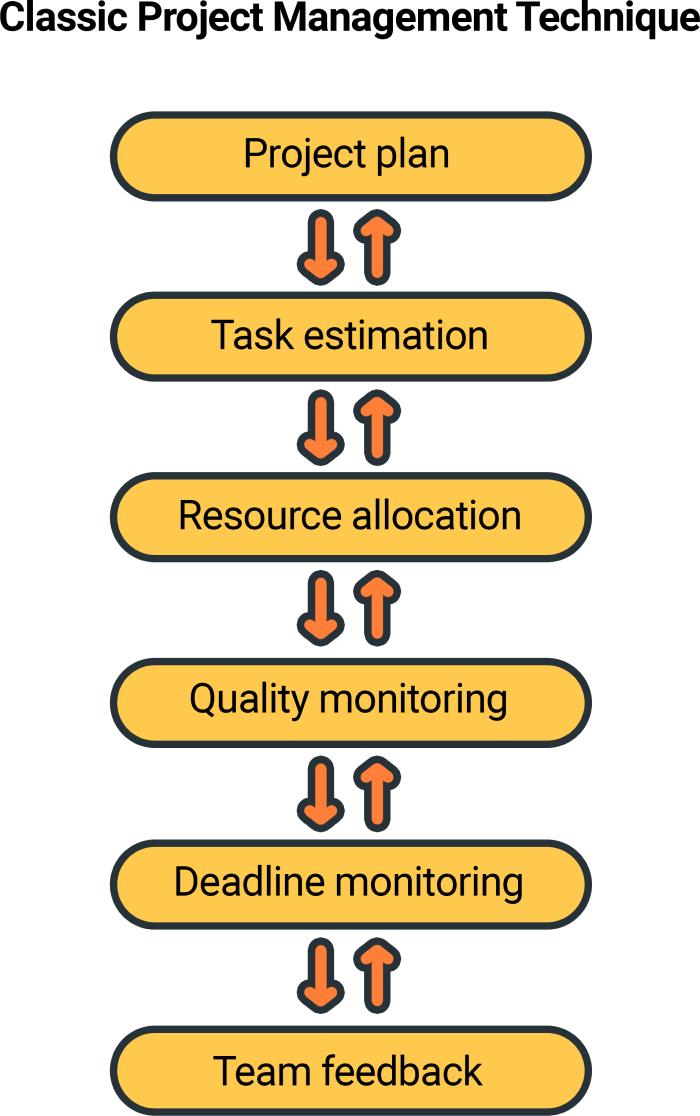
The Classic Project Management Technique is one of the simplest, most-often used techniques in project management. It includes a detailed plan with all the tasks and activities that should be performed. Things to be done are arranged based on their urgency and dependency.
How to use the Classic Project Management technique?
To apply this technique to your project successfully, here are the steps that you need to follow:
- First, you make a plan for your project for the upcoming week
- Then, you estimate the number and type of tasks you’ll need to work on
- You allocate the resources
- You monitor the quality of your team’s work throughout the project
- You monitor the team’s deadline throughout the project
- You provide feedback to the team throughout the project
A brief history of the Classic Project Management Technique
This basic type of project management, on the whole, originated in the 1950s. However, we can trace the first glimpses of project management way back to 2570 BC and the completion of the Great Pyramid of Giza. So, it’s difficult to pinpoint the exact origin of this most basic type of project management technique.
What is the Classic Project Management technique best for?
- Small teams and straightforward projects that don’t require complex workflows
Visual representation of the Classic Project Management Technique
Below you will find a visual representation of the stages that need to be followed in the Classic Project Management Technique.
2. Kanban Project Management Methodology
Considering its Japanese origin, the word “Kanban” translates to billboard. Kanban is a visual planning board that arranges work items into development columns.
What is Kanban?
Kanban is a popular subtype of the agile project management methodology meant to help you visualize your project and then track your progress on it. One of its main perks is that it facilitates work transparency.
How to use Kanban?
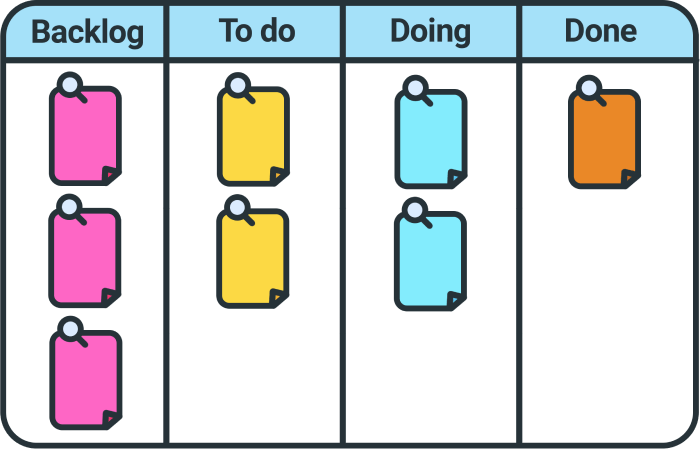
A simple Kanban board consists of three distinct columns. You move your tasks across the columns to signal the progress and current status of a task:
- “To Do” column — When you first define a task you need to work on in the future you place it here.
- “Doing” column — When you start working on a task you place it here.
- “Done” column — When you finish work on a task you place it here.
Modern software often offers Kanban templates to elaborate on this simple framework.
A brief history of Kanban
We can trace Kanban back to the company Toyota and their “Just-In-Time” (JIT) production system — this system mandates you to do only what you need to do, and only in the amount you need to do it.
What is Kanban best for?
- Software development projects
- HR projects that focus on recruiting, interviewing, and hiring new employees
- Any type of project with a well-established workflow and deadlines
Visual representation of Kanban
In the image below, you can see 3 columns in the board that we previously mentioned, together with the Backlog column. It represents the list of tasks that should be done aligned in order based on the priority as opposed to the To-do column which is the list of things we selected to do from the Backlog.
3. Program Evaluation and Review Technique (PERT)
This mapping project management technique helps you make realistic time estimates to complete the entire project.
What is the Program Evaluation and Review Technique (PERT)?
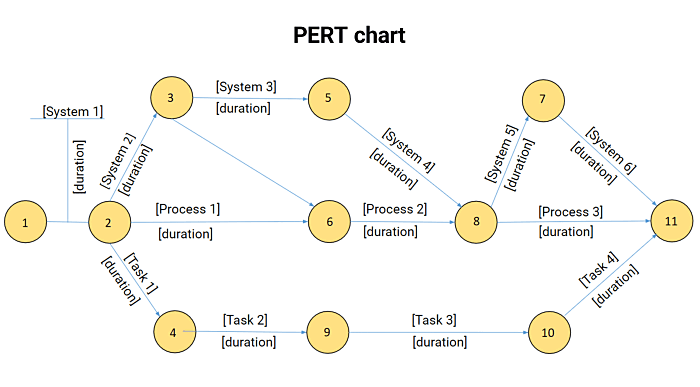
The Program Evaluation and Review Technique (PERT) in project management entails visual tracking of complex, detailedly planned projects in specialized PERT charts. The emphasis of this technique is on constant task analysis, estimating the time and budget needed to successfully finish a project.
How to use the Program Evaluation and Review Technique (PERT)?
To create a PERT chart, follow these steps (you can use software or draw it yourself):
- Make a thorough list of your project’s activities, tasks, or milestones (you need to identify all the tasks that you need to complete to achieve milestones i.e. deliverables)
- Now that you have a list of the tasks and milestones needed to complete the project, carefully create a sequence of tasks — which tasks go first — based on their dependencies.
- This is a pivotal step since here you need to make time estimates for your tasks such as the earliest start and finish date/time, and the amount of time needed to complete each task within a project.
- Identify your project’s critical path which covers the most important (not all) steps to help you estimate the minimum amount of time required to complete the project.
- Just because you made this chart doesn’t mean you need to strictly follow it. Project management is all about altering and effectively adapting to changes.
A brief history of the Program Evaluation and Review Technique (PERT)
PERT was first established in 1957 by the U.S. Navy Special Projects Office to help the U.S. Navy carry out its nuclear submarine project. It would later be used across various industries — one of the more famous uses of PERT in its earlier history includes its use in the organization of the Winter Olympics in 1968.
What is the Program Evaluation and Review Technique (PERT) best for?
- Complex projects with a large number of non-routine tasks
- Large projects with complex requirements
Visual representation of the Program Evaluation and Review Technique (PERT)
In this chart, you can see:
- Yellow circles, i.e. nodes, which represent important milestones or events
- Arrows stand for dependent tasks that need to be completed in that order together with their durations (also shown on the arrows)
- Diverging arrows ( 8-7 and 8-11) which represent tasks happening at the same time
Best Project Management Techniques for Simple Projects
Moving on from PM methodologies for any type of project, we have project management methodologies for “simple projects”.
You’ll recognize a simple project based on the following project parameters:
- It is expected to take less than 6 months to complete
- It only requires part-time effort
- It involves 10 team members or less
- It is expected to cost less than $75,000
- It has the expected cost amount readily available from the start
- It has a single goal
- It has a straightforward solution
- It has a narrow project scope
💡 The cost of your project-related tasks and processes play a vital role in helping you determine whether your project is a simple one — to learn more about how to determine project and management costs, read our blog post about project cost management.
The Best Project Management Techniques to use With Simple Projects Are:
- Work Breakdown Structure (WBS)
- The Waterfall Technique
- Gantt Chart
1. Work Breakdown Structure (WBS)
This amazing hierarchical technique helps you make a visual outline of the tasks that you need to tackle to complete the project efficiently.
What is Work Breakdown Structure (WBS)?
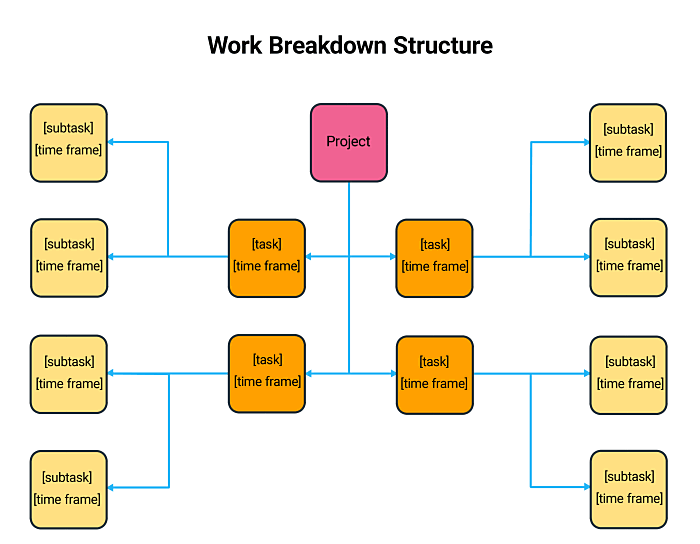
The Work Breakdown Structure (WBS) requires you to break down your project into its parts — i.e. smaller and more manageable pieces. According to PMBOK, work decomposition needs to be done “to accomplish the project objectives and create the required deliverables.” Visually speaking, WBS helps you have a holistic view of all of the components within your entire project (tasks and subtasks).
All of your work within the Work Breakdown Structure needs to be properly identified, estimated, budgeted, and scheduled.
How to use the Work Breakdown Structure?
Use WBS to break down complex tasks into smaller tasks until you can no longer subdivide these tasks. Smaller tasks are easier to work with since it’s easier to estimate the time requirements and the cost to complete them.
When you decompose your project to the lowest levels in the WBS, those levels are called work packages. When you identify them, you can easily and safely estimate time and costs for the work together with controlling and managing them efficiently.
Since most projects have a similar life cycle, there are standard WBS templates that you can use to modify them to fit your projects.
💡 If you need more help on how to break down a project into more manageable components, check this article out → How to Break a Project Down into Tasks
A brief history of the Work Breakdown Structure
WBS was first developed in the 1960s by the U.S. Department of Defense (Dod) and the National Aeronautics and Space Administration (NASA) since they needed a workable planning and controlling system for the huge projects they had.
What is the Work Breakdown Structure best for?
- Simple projects that mostly focus on the task dependencies within the scope of the project
Visual representation of the Work Breakdown Structure
Here you can see all the tasks and subtasks that make up a project. You can break the project tasks down as far as you need to properly manage them, estimate the time and cost.
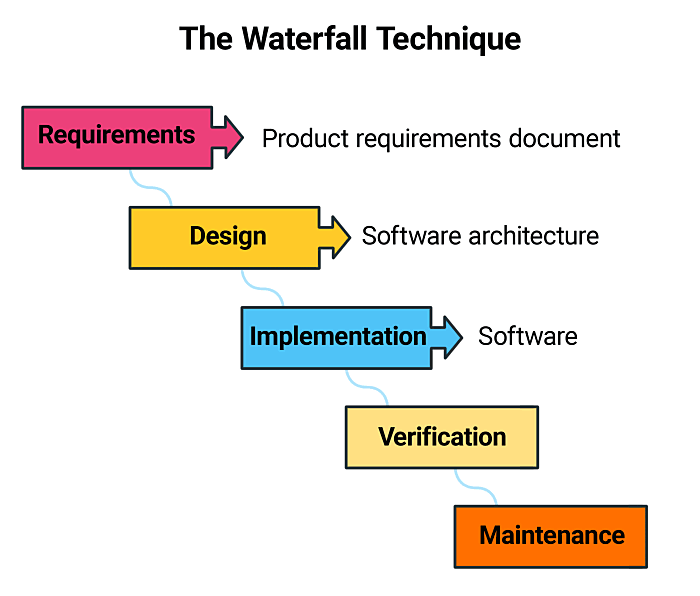
2. The Waterfall Technique
This technique is based on a sequential design process much like a waterfall where phases flow from one to another.
What is the Waterfall Technique?
The Waterfall Technique mandates a sequential execution of tasks — you can only move on to the next step if you’ve finished with the previous one.
This technique mandates that you have a clear idea of what the project requires and how it will unfold before you start working on it — once you’ve moved on to the next step, you cannot go back to the previous to make corrections.
How to use the Waterfall Technique?
The concrete steps will depend on the type of project, but usually involve:
- Analyzing and identifying software requirements,
- Designing the best approach to develop the software according to the requirements,
- Implementing suitable solutions to problems by writing appropriate code,
- Testing out the code and verifying that it works the way you intended,
- Carrying out regular maintenance to make sure the code keeps working the way it was intended.
A brief history of the Waterfall Technique
The Waterfall Technique was first formally described by Winston W. Royce, in an article published in 1970. However, it wasn’t described by that name — the term “Waterfall technique” would first be mentioned in a paper by T.E. Bell and T.A. Turner in 1976.
What is the Waterfall Technique best for?
- Short and simple software development projects
- Software development projects which have clear, predetermined requirements
- Creative project management
- Projects that require a strict work structure to succeed
Visual representation of the Waterfall Technique
You can see from this visual representation that in the Waterfall Technique you can only go forward since it doesn’t allow you to return to a previous phase. It respects strict order.
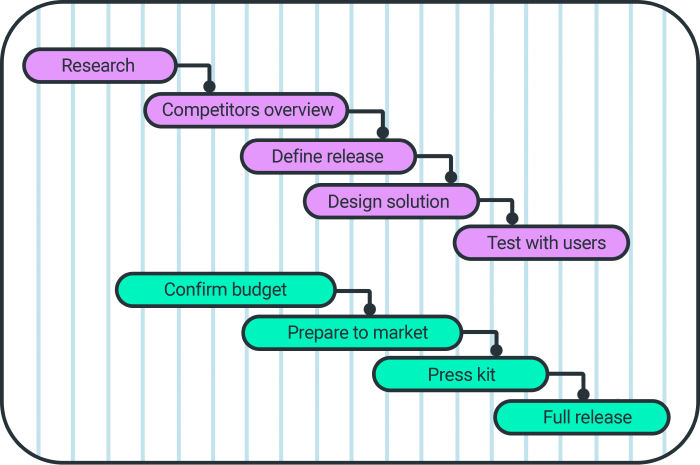
3. Gantt chart
This hands-on project management technique uses bar charts to simplify and visualize a project’s scheduling and planning processes.
What is a Gantt chart?
A Gantt chart is one of the oldest project management techniques. It’s a type of horizontal bar chart that illustrates a project’s schedule. Each activity in the project is represented by a bar and its length represents the duration of each task — its start, and finish dates. The position of the bar is also important since it stands for the scheduling of the task. If one task follows another, then that means the task is dependent upon the completion of the predecessor task to get started. You may also see other geometrical signs within the chart such as a diamond or triangle-shaped symbol which represents an important milestone during a project. The Gantt chart is widely known for its simplicity and low cost.
How to use a Gantt chart?
Gantt chart can operate independently or you can apply it to your project since various project management tools include Gantt chart views. Simply add your tasks to the list and drag them into the timeline. Then, assign tasks or resources and add dependencies to make sure that tasks are done in the proper order.
A brief history of a Gantt chart
If you think that Henry Gantt, an American mechanical engineer, and project management consultant, invented the Gantt chart — think again. A Polish engineer Karol Adamiecki developed a chart that he first called harmonogram — but, it was in Polish, which limited its diffusion and adoption. Somewhere between 1910 and 1915, Henry Gantt designed his version of Adamiecki’s chart which is known and widely used today.
What is a Gantt chart best for?
- Any type of project complexity
- Various industries such as software development, design, manufacturing, marketing, etc.
Visual representation of a Gantt chart
As you can see below, bars represent activities (what needs to be done).
Best Project Management Techniques for Complex Projects
Next up, we have complex projects and their specific project management techniques.
You’ll recognize a complex project because it is:
- Challenging to anticipate project outcomes
- Challenging to anticipate project behaviors
- Challenging to standardize the roles in your team
- Challenging to estimate the number of elements in the project
- Challenging to grasp the dependencies between project elements
- Challenging to anticipate project profitability
The best project management techniques to use with complex projects are:
- Critical Path Method (CPM)
- Critical Chain Project Management (CCPM)
- Extreme Project Management (XPM)
- Projects IN Controlled Environments (PRINCE2)
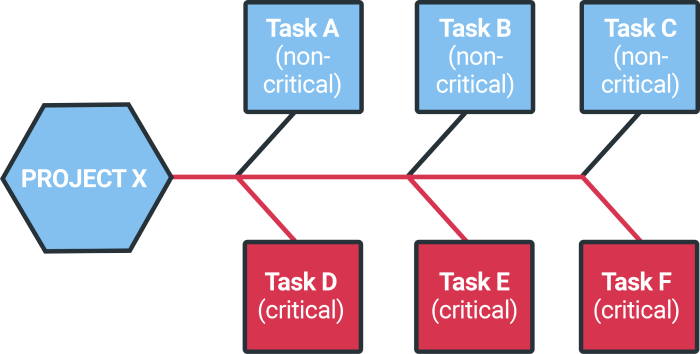
1. Critical Path Method (CPM)
Up next is a project management technique that helps identify tasks based on their importance and dependencies.
What is the Critical Path Method (CPM)?
The Critical Path Method is a scheduling algorithm for identifying critical tasks within the longest sequence of tasks in a project — these tasks are crucial for beating the project deadline and as such demand the team’s sharpest focus.
How to use the Critical Path Method (CPM)?
Here is a step-by-step guide that you need to follow to find your project’s critical path:
- First, you identify and categorize all project tasks
- Next, you define the expected duration for each task
- Then, define the dependencies between tasks
- After that, determine the type of dependencies between tasks:
- You need to work on Task 1 and Task 2 simultaneously
- You need to finish Task 1 before you can start working on Task 2
- You need to start working on Task 1 to start working on Task 2
- You need to finish work on Task 1 to finish work on Task 2
- Last, schedule and work on your tasks in the order dictated by their task dependencies type
A brief history of the Critical Path Method (CPM)
The Critical Path Method (CPM) was established in 1957 at the DuPont Company, one of the historically largest chemical companies (in terms of sales). The founders of the technique were two mathematicians who wanted to avoid the schedule-related added costs of shutting down and restarting plants — their solution included working on the right tasks in the right order.
What is the Critical Path Method (CPM) best for?
- Projects with several interdependent tasks
- Projects with repetitive tasks
- Projects that have strict deadlines and timelines (e.g. software development or construction projects)
Visual representation of the Critical Path Method (CPM)
In this visual representation, you can see what needs to be done to complete Project X. Tasks A, B, and C are non-critical, and you can complete the project if you don’t tackle these tasks. Therefore, these are optional tasks. On the other hand, tasks D, E, and F are considered “critical”, and you must tackle them to complete the project.
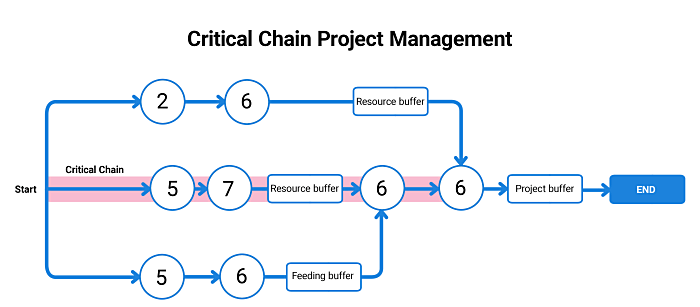
2. Critical Chain Project Management (CCPM)
This is another scheduling analysis technique that will help you stay on budget while at the same time keeping your team from overworking.
What is the Critical Chain Project Management (CCPM) technique?
Critical Chain Project Management (CCPM) is essentially a scheduling algorithm that places great emphasis on the resources needed to carry out the project, the dependencies that exist between tasks, and the buffers you need to account for to complete the project on time.
The purpose of this project management methodology is to help you manage your resources better, minimize the time you lose on various aspects of the project, and distribute your workload evenly.
There are 4 types of buffers associated with CCPM:
- The Project Buffer — i.e. the one that makes sure the project is completed before its expected end date.
- The Feeding Buffer — i.e. the one that is positioned between the last task on a non-critical chain and the last task on a critical chain.
- The Resource Buffer — i.e. the ones that make sure the right resources are available to carry out the project processes throughout the project development.
- The Capacity Buffer — i.e. the one that ensures additional resources are available in the case of unexpected issues with the budget.
How to use the Critical Chain Project Management (CCPM)?
Take the following tips into consideration when creating a critical chain project process:
- Identify the most important tasks which will later become your critical path.
- Bear in mind to allocate resources accordingly (time, budget, people).
- Make sure your team functions as a well-oiled machine and focus their attention on individual tasks.
- As we previously stated, team members should be assigned one task at a time, and this is done to prevent multitasking. Multitasking and CCPM do not go hand in hand.
- This may sound harsh but has proven to be efficient — reduce the time estimates for project completion in half. This way, you eliminate procrastination within your team and avoid poor utilization of time. Good thing is that you have buffers in case you didn’t make realistic time estimate reductions or you can use them for any unforeseen situations.
- Finally, create a project model that should have time estimates, a list of resources used, buffers, and finish dates. This is done to avoid project delays.
A brief history of the Critical Chain Project Management (CCPM) technique
The Critical Chain Project Management (CCPM) derives from the Theory Of Constraints — it was first introduced in 1997, by Eliyahu M. Goldratt in his book, Critical Chain.
What is the Critical Chain Project Management (CCPM) technique best for?
- Companies where each team works on one project only, without any overlaps in resource
- Teams who have trouble keeping up with deadlines
- Complex projects that have limited resources
Visual representation of the Critical Chain Project Management (CCPM) technique
The CCPM technique proposes adding buffers as a type of “airbag” which can be utilized in unexpected situations. As you can see from the picture below, each task (marked as circles in the diagram) is given a buffer that protects the project’s deadlines or any other change during a project.
3. Extreme Project Management (XPM)
The upcoming technique focuses on managing the project’s stakeholders rather than its plan and schedule.
What is Extreme Project Management (XPM)?
Extreme Project Management (XPM), as its name suggests, is a project management technique made for complex and fluctuating projects — i.e. projects that frequently change and require an extreme approach in their management.
This technique focuses on the human side of the project — it makes use of the known principles of how people interact with each other to properly tackle and arrange collaboration within a project.
How to use Extreme Project Management (XPM)?
A project in XPM goes through 4 phases (INSPIRE) according to Doug DeCarlo in his Extreme Project Management book:
- INitiate — In this phase, you gather your team, brainstorm, think about possible approaches, and build a strong relationship with your client. Remember that in XPM, you don’t define your project goal at the beginning but along the way. It’s not something that you can plan. Since the goal is flexible, so are the time estimates and cost of the project.
- SPeculate — This is the time for brainstorming ideas, deep thinking, and prioritization of deliverables. “I wonder if this would work?” is a question that you’ll be asking yourself in this phase.
- Incubate — Even though you now have a list of prioritized deliverables in this phase, they are not fixed. In this phase, you are still going to explore, make corrections together with the client. This may result in new ideas and goal clarification. In this phase, you need to distribute work across your team. Previously prioritized deliverables must be assigned to team members to create a synergy among team members. The goals can be achieved only with strong collaboration within the team.
- REview — In the last phase of the XPM, team members should attend a meeting and talk about achievements in the Incubate phase, things they learned, revising the goal, and whether the project meets client expectations and should be continued. The number of cycles is unknown, and if there is a necessity to go through the entire 4 phases again — the client and team members will make a joint decision about that.
A brief history of Extreme Project Management (XPM)
The concept of Extreme Project Management (XPM) originated in 2004, in the previously mentioned book Extreme Project Management by Douglass DeCarlo.
What is Extreme Project Management (XPM) best for?
- Projects with a low possibility for failure
- Projects with short deadlines
- Projects that aim for innovation
- Projects with factors that are difficult to control
- Projects characterized by sudden, spontaneous changes
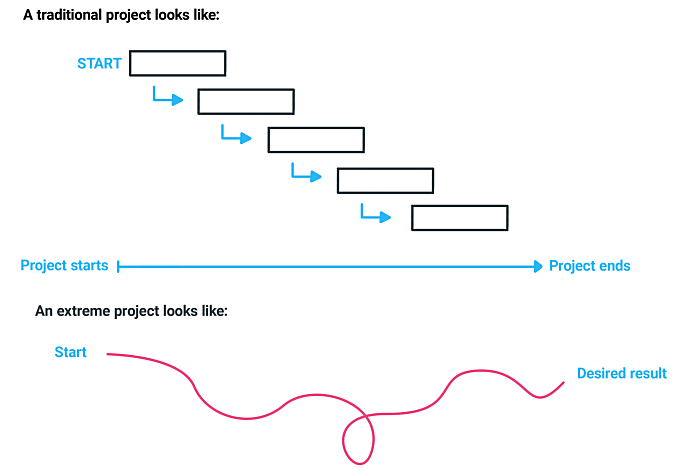
Visual representation of Extreme Project Management (XPM)
From this visual representation, you can get a better insight into XPM’s flexibility and freedom when it comes to making decisions about the approach, cost, timeframe, and scope. Do not adapt the project to a fixed set of rules and approaches, adapt the rules and approaches to the project itself until you achieve the desired result.
4. Projects IN Controlled Environments (PRINCE2)
Up next is one of the world’s most practiced techniques for project management due to its scalability, flexibility, and practicability. As opposed to XP, managing projects in PRINCE2 is clearly planned and organized in each stage of the process.
What is PRINCE2?
Projects IN Controlled Environments (PRINCE2) is a structured project management technique that provides a framework to help divide the project into stages. It is a methodology that consists of 7 principles, 7 themes, and 7 phases each project needs to go through.
PRINCE2 Principles
They represent underlying rules that every project needs to stick to — according to the 2017’s edition of PRINCE2:
- Continued Business Justification— The business case is regularly updated to make sure that the project is still usable.
- Learning from experience — Each project has a lesson log you can refer to to avoid remaking already established workflows from scratch.
- Defining roles and responsibilities— Team members may have several roles in a project, or share their roles with other team members. Roles are structured into 4 different levels:
- The corporate management/program management level
- The project board level
- The project manager level
- The team level
- Managing by stages— You manage each stage of project development differently, by updating the business case, risks, and project plan.
- Managing by exception— When a specific project element (such as the project scope or project costs) changes, the question of how to continue moves to a higher level of management.
- Product focus— Focus is placed on the quality end delivery of the developing product.
- Tailoring to suit the project environment— This technique is meant to fit the project environment, i.e. the size, complexity, risk estimation, and overall importance of the developing project.
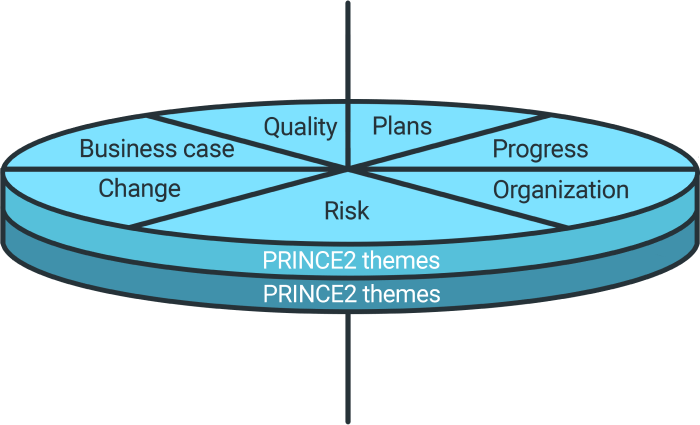
PRINCE2 Themes
Themes tell you how to manage a project using PRINCE2 principles. Projects need to address these themes all the way through.
- Business Case — Gives justification, i.e. reason for undertaking a project. It answers the question of why.
- Organization — Defines roles and responsibilities within the project. It answers the question of who.
- Quality — Ensures that the project’s deliverables meet business expectations. It answers the question what.
- Plans — Describes the techniques and steps that you need to take to develop plans. It answers the questions of how and when.
- Risk — Identifies and assesses uncertainties. It answers the question What if.
- Change — Handles change requests and finds the way to successfully manage them. It answers the question of what’s the impact.
- Progress — Tracks, checks, and monitors the project. It answers the questions where are we now, where are we going, should we carry on.
How to use PRINCE2?
If you want to manage a project using PRINCE2, you need to be aware of the 7 phases each project needs to go through:
1. Starting up a project
You start your project with a project mandate which is an initial document provided by the customer and it is required to start the project (it outlines the basic information that is available at the starting point). To make sure the project is viable, a project brief is produced and carefully reviewed by the project board to decide on whether to initiate the project. Within this phase, several activities must be completed such as appointing the project manager together with other stakeholders, preparing the business case, choosing an approach, and assembling the project brief.
2. Directing a project
This is the time when the project board makes key decisions about the project, whether it is worthwhile initiating, and delegates the project to the project manager when authorized. Activities within this stage include reviewing the project brief, formally confirming the approach with the rest of the stakeholders, and thinking about the risk and resource requirements.
3. Initiating a project
In this stage, reasons for doing a project must be stated together with the scope of work, cost, responsible stakeholders, how risks or changes should be managed. The project manager needs to assemble the Project Initiation Document — a formal document (or collection of several documents) where all questions such as what, who, why, where, how, when, and how much must be clearly stated.
4. Controlling a stage
The whole process must be carefully controlled and monitored at all times to avoid issues and loss of focus. The project manager must give authorization for any activity to be commenced or continued. That’s why the project manager breaks down the project into smaller chunks — work packages to avoid chaos. Each work package must go through control after completion or change. In a nutshell, everything must work smoothly which is the project manager’s responsibility.
5. Managing product delivery
The purpose of this stage is to ensure that all stakeholders agree on what is to be produced, its cost, and timescales together with meeting the quality criteria. Later, they can approve them or demand changes to be done.
6. Managing a stage boundary
Each stage must be carefully reviewed and approved to be able to move forward. The Project Board must be informed at strategic points of the project, and they are the ones who make a final decision on whether to stop or continue to the next stage.
7. Closing a project
This is the final stage of managing a project where acceptance of the product is being confirmed and whether PID’s objectives are achieved. A project is successful if it has a clear end.
A brief history of PRINCE2
PRINCE 2 is a variation of an earlier method named PROMPT II — in 1989, the UK government adopted this PROMPT II variation as a standard for project management in the IT sector. Today, it is the official project management methodology for all UK government projects.
What is PRINCE2 best for?
- Complex projects that have a fixed set of requirements and a complex environment.
Visual representation of PRINCE2
From the visual representation below, you can see that PRINCE2 is built on its principles, i.e. guides and rules that you need to follow to successfully carry out a project. Then, PRINCE2 themes show you how to manage the project, i.e. how to put principles into practice.
Best project management techniques for software engineering
A typical software engineering project involves gathering requirements, developing and testing the software, and performing regular maintenance on the software product.
The best project management techniques to use with software engineering projects are:
- Rational Unified Process (RUP)
- Agile Project Management
- Scrum Methodology
- Extreme Programming (XP)
1. Rational Unified Process (RUP)
This project management technique is repetitive and agile at the same time. It’s repetitive because activities repeat during the project, and agile since they can be adjusted to fit the software requirements.
What is Rational Unified Process (RUP)?
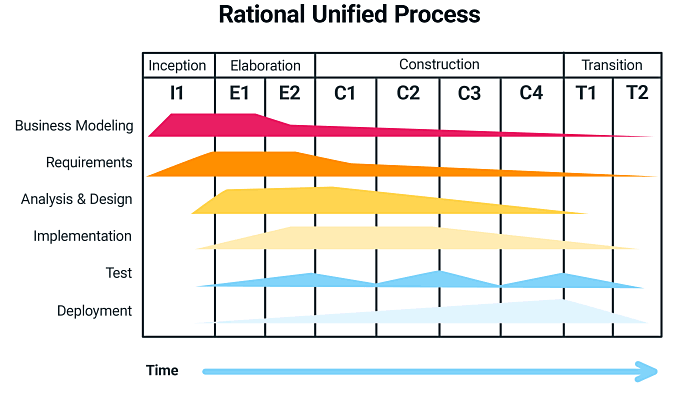
The Rational Unified Process (RUP) is an agile management structure for software development teams that makes a project unfold over time in 4 distinct phases — Inception, Elaboration, Construction, and Transition. Each of the 4 phases has a main objective and involves 6 development disciplines — Business Modeling, Requirements, Analysis & Design, Implementation, Testing, and Deployment. Unless you successfully reach the main objective of the previous stage, you won’t be able to move on to the next stage.
Some development disciplines are more important than others, so they take up more time than others.
How to use Rational Unified Process (RUP)?
As we previously mentioned, to use the RUP technique efficiently, the software must go through 4 phases of development:
- Inception — Since this is an itinerary step in the process, you must create a business case that includes a project plan with its description, risk management assessments, business environment, and success factors. Having all in mind, stakeholders decide whether to continue with the project or not. The inception stage is also the first milestone in the project. In case the project fails to pass this stage, it can be canceled or redesigned.
- Elaboration — In this stage, you should consider the project’s technical risks, i.e. whether you are able to build a workable system. This is the second milestone in the process, and it’s critical because it holds high risks, and it’s hard to induce changes later on.
- Construction – This is where major components and features are develoed together with coding and testing. This stage results in user manuals and a beta version of the system that needs to be evaluated.If the product fails the testing, the next stage – the Transition stage – needs to be postoned.
- Transition — The main purpose of this stage is to release a product successfully, and this is the last milestone in this process.
A brief history of Rational Unified Process (RUP)
The Rational Unified Process was established by the Rational Software Corporation in 2003.
What is Rational Unified Process (RUP) best for?
- Software development projects with a predictable time frame for completion and a predictable end budget.
Visual representation of Rational Unified Process (RUP)
In the visual representation below, you can see all four phases of the project development in RUP. You can also notice that some phases (Elaboration, Construction, and Transition) have more iterations that focus on producing technical deliverables to achieve each phase goal.
2. Agile Project Management
This project management technique proposes flexibility and adaptability to easily adjust to changes within a project life cycle. The word “agile” itself means being able to change, i.e. adapt.
What is Agile Project Management?
Agile Project Management is a methodology for software development that emphasizes self-organization and cross-functionality in a team, as well as reaching customer satisfaction.
How to use Agile Management?
There are several principles you need to follow to successfully use Agile Management in your projects:
- Instead of implementing specific processes and tools, this technique emphasizes interactions between individuals in a team.
- Instead of compiling comprehensive documentation for the product, this technique emphasizes creating a fully-working software.
- Instead of focusing on contract negotiations, this technique emphasizes utilizing client collaboration to facilitate the development procedure.
- Instead of following a strict project plan, this technique emphasizes the best ways the team can respond to changes in the project.
For better understanding, follow the steps:
- First, you divide projects into short sprints
- You adapt your project plans as you work and aim for constant improvement
- The project manager encourages the team to be self-organized
- You aim to produce maximum value and functionality from the service/product you want to offer
A brief history of Agile Project Management
Agile Project management was officially developed in 2001 as a part of the Agile Manifesto.
What is Agile Project Management best for?
- Projects who don’t have strict deadlines, but do have a general idea of the final outcome/product
- Projects that imply unexpected changes
- Projects that depend on efficient team collaboration rather than efficient project planning
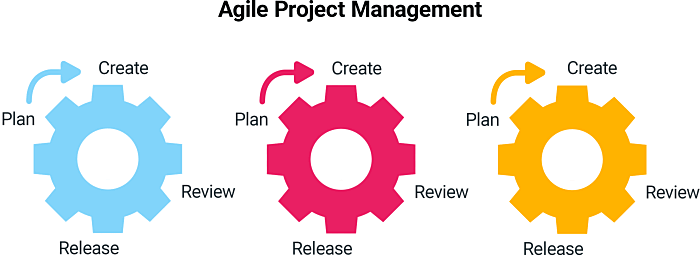
Visual representation of Agile Management
As you can see, Agile Management is an iterative process whose ultimate goal is to respond to changes.
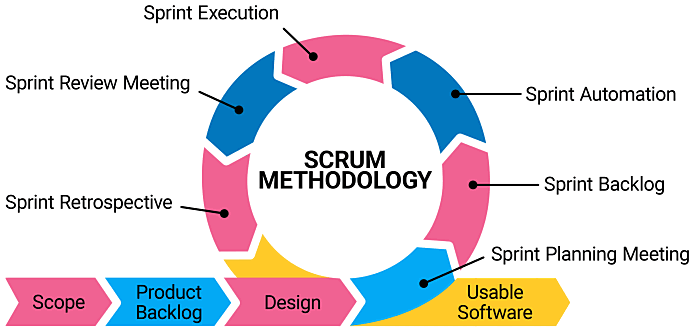
3. Scrum Methodology
This is another flexible project management technique that is based on iterative processes, adjustments, and continuous learning.
What is Scrum Methodology?
Just like Kanban, Scrum is another popular subtype of the agile project management methodology — its aim is to help software development teams deliver working software more frequently, with the help of incremental and iterative practices.
Project progress is measured by following the sequence of short, timeboxed periods named sprints — the end of each sprint should mean the completion of one scheduled amount of work.
How to use Scrum Methodology?
Here are 6 steps to running a project using the Scrum Methodology:
- Assign your team — First of all, you need to assign people who will develop, produce, or perform any other responsibilities to create an end product (a Scrum master, a product owner, etc.)
- Create a product backlog — This is the place where you make a list of the work that needs to be done which are also known as stories.
- Create sprints — A sprint is a short period of time where the work is broken down into more manageable components. Add stories from the backlog here.
- Host a meeting — This is a short daily meeting called a “daily scrum” or “stand up” meeting. The whole team talks about the progress and tackles issues if there are any.
- Host a sprint review meeting — This meeting takes place at the end of a sprint. All critical stakeholders need to be present to discuss results, gather data, and make plans for improvements or changes.
- Repeat — You need to repeat the two previous steps until you complete the final sprint and create deliverables.
A brief history of Scrum Methodology
As previously mentioned, Scrum now officially falls under the umbrella term “Agile” — yet, it was first by that name introduced by Hirotaka Takeuchi and Ikujiro Nonaka in 1986, in their paper The New Product Development Game.
What is Scrum Methodology best for?
- Complex and ambiguous projects — traditionally, these are software development projects, but Scrum can also be an efficient approach for marketing projects and leadership teams.
Visual representation of Scrum Methodology
The steps to running a successful Scrum project are presented in the following image together with other activities needed to complete the project.
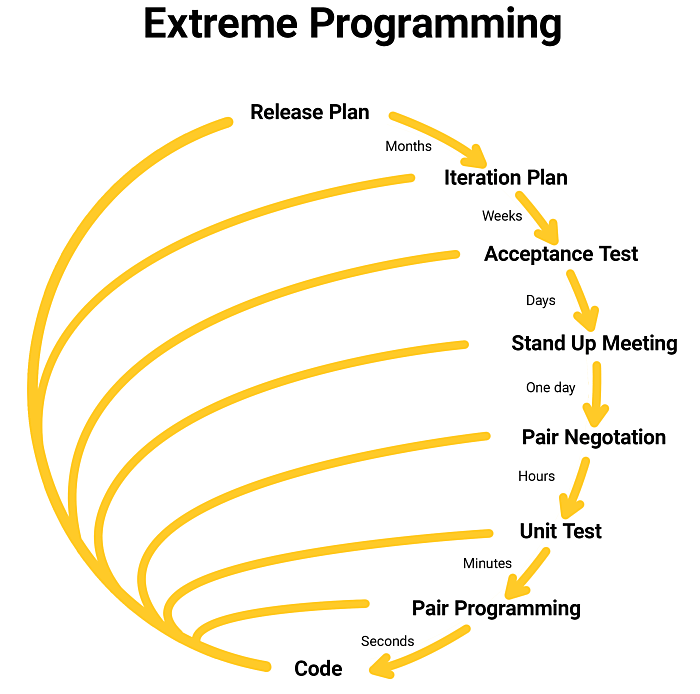
4. Extreme Programming (XP)
Extreme programming (XP) is a collaborative technique that encourages teamwork and proposes the decomposition of complex projects into multiple smaller and more manageable releases.
What is Extreme Programming (XP)?
Extreme Programming (XP) is a specific agile software development framework whose main aim is to help the team produce higher-quality software while using less time to manage project releases and satisfy customers’ needs.
Extreme Programing mandates the following project-related activities and principles:
- Maintain constant communication — with an emphasis on face-to-face discussions coupled with whiteboard drawing.
- Do the simplest thing that works — with an emphasis on doing only what’s necessary and addressing only the current project requirements.
- Provide regular feedback — with an emphasis on the “build-gather-adjust” work cycle. The team builds a feature, gathers feedback about the feature, and then adjusts the feature based on the feedback.
- Act with courage — with an emphasis on accepting difficulties, acting on feedback, reacting quickly, and asking controversial questions when needed.
- Promote respect — with an emphasis on providing feedback to others, accepting feedback from others, and all that with respect.
How to use Extreme Programming (XP)?
Follow the steps:
- Plan — The initial step is where the planning is done, i.e. where a customer writes user stories — a brief explanation of customer requirements for particular features.
- Communicate — Since project management is 90% communication, the next step is where the project manager needs to build a smooth-running team.
- Restructure — Start from the easiest design first and move on to the complex ones. You should create smaller and more manageable components to keep your code brief but comprehensive. Don’t forget to create spike solutions — small experiments that can help you find out answers to tough design issues.
- Code — Now is the time to implement code. Since XP uses the Collective Ownership model, it is not dependent on individual developers, and the code is owned collectively — any team member who notices an issue in the code should tackle the task in no time.
- Review and test — Finally, every step of the process must go through thorough and repetitive testing, prior to code release.
A brief history of Extreme Programming (XP)
Extreme Programming (XP) was first established in the 1990s by Kent Beck who implemented this technique in the work on the C3 payroll project.
What is Extreme Programming (XP) best for?
- Dynamical, ever-changing software development projects
- Co-located development teams
- Risky projects with fixed time frames
Visual representation of Extreme Programming (XP)
You can see the steps explained below in this visual representation which, in addition, includes the last stage — pair programming. We already said that XP supports teamwork and collaboration, therefore pair programming is done so that team members can work in pairs at a single computer. This strengthens collective ownership, and, what’s more — both team members learn from each other.
Project Management Techniques and Tools
Regardless of the specific Project Management Technique you’re using and the type of project you’re working on, you’ll still need to tackle and carry out certain general tasks and processes — namely, you’ll need to:
- Organize and plan the project workflow
- Schedule the project in some capacity
- Manage your time properly
- Communicate with your team
- Collaborate with your team
- Handle the accounting & finance aspect of the project
Now, the best way to do all that is to use project management tools.
But, not just any project management tool — according to research that investigated popular demand in terms of PM features, the set of tools you use for project management should offer the following functionalities:
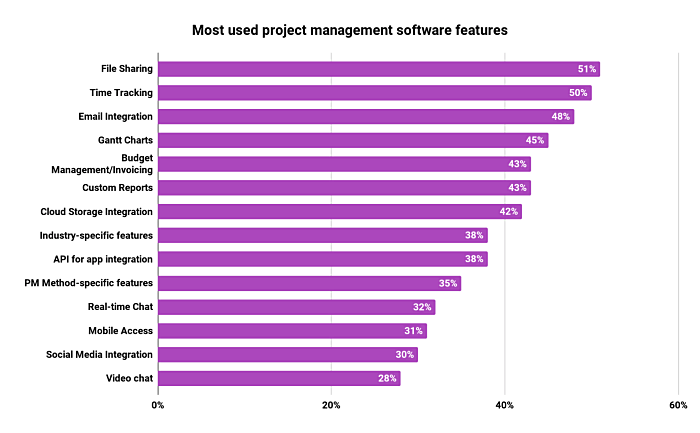
As you can see, File Sharing, Time Tracking, Email Integration, Gantt Charts, Custom Reports, and Invoicing features take the lead with the highest shares (from 51% to 43%) — while Cloud Storage Integrations, Industry-specific features, API, PM method-specific features, Real-time chat, Mobile access, Social Media Integrations, and Video Chats follow closely (from 42% to 28%).
With that in mind, here’s a list of the best project management tools with the said features, for each type of tasks and processes associated with work on projects:
PM tools for organizing and planning the Project Workflow
The following tools can help you connect with your team in an organized manner while making detailed project planning, focusing on important tasks, and sequencing them accordingly.
Trello
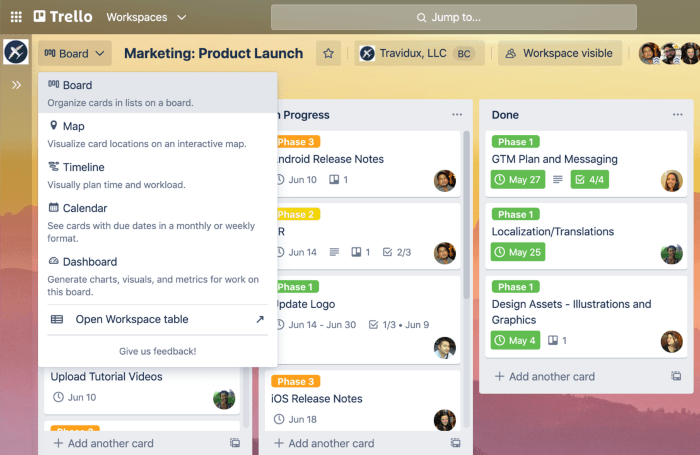
This tool allows you to organize and plan your tasks, and then track their progress across aptly named columns.
You can see who is working on what, which things are in the progress, and where they are in the process. It keeps you connected with your team, and everyone is informed about the status of tasks:
- To do
- Doing
- Review
- Ready to publish
The amazing thing about Trello is that it can be applied to various industries, and you can make custom columns that suit your projects.
nTask
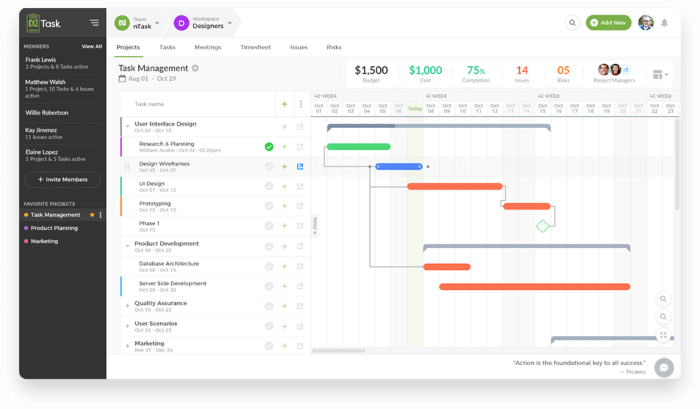
nTask provides its users numerous features, and we believe there is something for all:
Team collaboration ✅
With nTask — teamwork makes the dream work. This amazing app offers:
- Effective team collaboration
- Dedicated workspaces and team chat
- Forming teams and defining their roles
- Assigning tasks to team members and tracking their progress
Project planning ✅
Don’t let your project miss its completion date due to insufficient planning, and with nTask:
- Create thorough plans of what needs to be done, when, and where
- Allocate resources effectively
- Set billing methods
- View project status and progress
Task management ✅
Get more tasks done with nTask:
- Organize and track your team’s workflow on Kanban Boards
- Organize your tasks in List View, Grid View, or Calendar view
- Set reminders and color tasks for your tasks
- Gantt charts provide a visual representation of a project schedule, show task dependencies and linked tasks
Meeting management ✅
Keep everyone in the loop:
- Invite people to your meetings through personalized email invites
- Organize and keep track of your meetings
- Develop a clear meeting agenda
- Set up recurring meetings
Timesheets ✅
Log hours in nTask timesheets:
- Keep track of your employees’ time
- Create multiple timesheets
- Approve and track past timesheets
➕ Other efficient apps you can use to organize and plan your project and project-related tasks include ClickUp, Taiga, and Asana.
PM tools for Project Scheduling
Running multiple projects and tasks simultaneously is no walk in the park. Missing the deadlines costs money and time. Consider creating a project schedule instead. A project schedule serves as a roadmap that includes a plan needed to achieve the goal, and tells how long it will take to complete it. With that in mind, we’ve selected some project scheduling tools for you.
Google Calendar
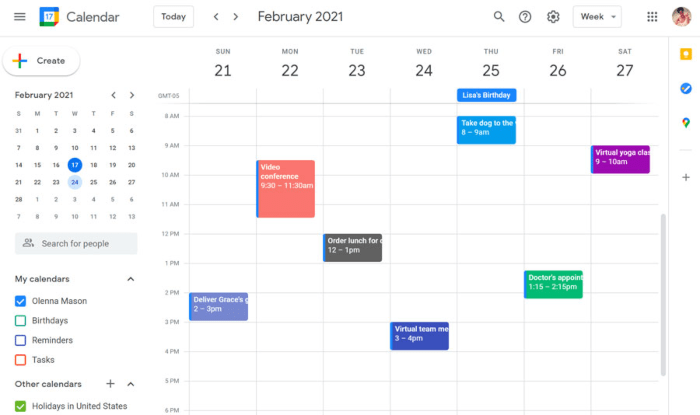
This tool allows you to schedule meetings and consultations with your team in straightforward calendar slots. With Google Calendar, you can never miss an appointment since you receive reminders about upcoming activities.
In Google Calendar, you can create to-do lists, customize your calendar with add-ons, customize your events to your liking, and more.
➕ Other efficient apps you can use to handle tasks and project scheduling include Doodle, Calendly, and Any.do.
PM tools for Project Scheduling
A quality project time management tool needs to manage time and tasks efficiently, include time tracking, billing, reporting, and make you feel safe while using it. That being said, consider using the following apps:
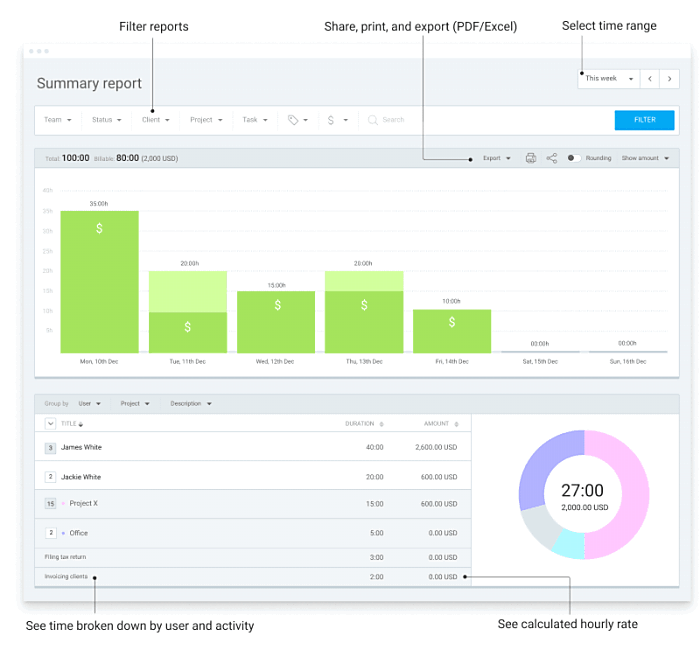
With Clockify, you can manage and track projects in a very convenient, transparent, and user-friendly way. What’s more, you’ll be able to track your team’s time and progress, set budgeting, and make precise time estimates for your projects.
This tool allows your team to track the time you spend on project-related tasks as you work (or after you’re done working), generate reports of your time use, and use them to identify where you could make improvements in your workflow.
In addition to using Clockify, you can also use Rescue Time or WakaTime to have the time you spend on specific apps tracked automatically.
PM tools for Project Communication
Team collaborations tools are of the utmost importance since they help open doors of communication within a team and enhance remote working from anywhere in the world.
We’ve selected some project collaboration tools for you:
Pumble
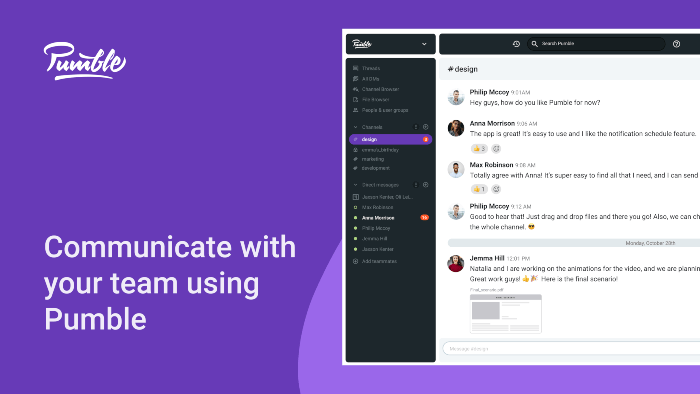
With Pumble, you are able to centralize all communication with your team in one place — and easily refer to past conversations, links, files, filter by channel, or person.
PM tools for project Collaboration
Apart from team communication, project collaboration is also crucial because it allows creating and collaborating in real-time. Of course, you’ll need a reliable app for that purpose:
Google Sheets
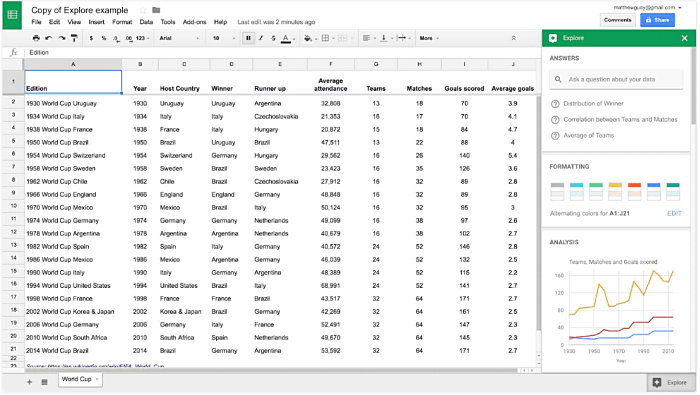
This tool allows you to add and calculate data, create charts, and analyze project statistics — multiple members of your team can manipulate data at the same time, and all your changes are saved instantly and automatically.
Other efficient apps you can use to handle various collaboration tasks include Dropbox (for online file sharing), Visme (for team brainstorming sessions), and Jira (for agile project management).
Jira
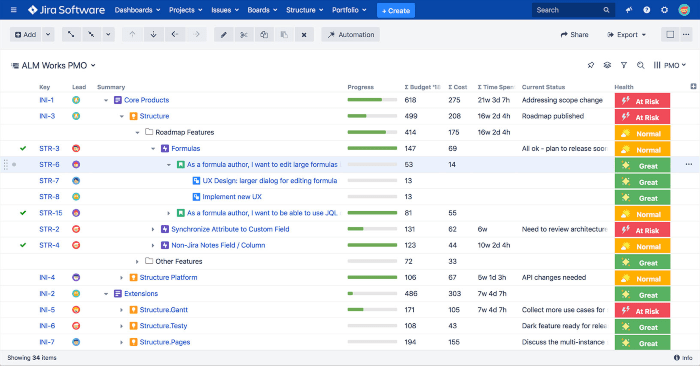
Jira has proven to be perfect for tracking bugs, resource management, tracking your team’s performance, and velocity.
Jira offers its users customizable dashboards, a user-friendly interface to track tasks, and report creation.
➕ Other efficient apps you can use to handle various collaboration tasks include Dropbox (for online file sharing), Visme (for team brainstorming sessions).
? For more great apps, check out our list of the best collaboration tools.
PM tools for Project Finance and Accounting
If you are running a business, you need to ensure your organization uses a reliable management software that promotes project transparency by analyzing budget and costs, generates reports, and centralizes all project-related transactions in one place.
Therefore, try using:
Sage Accounting
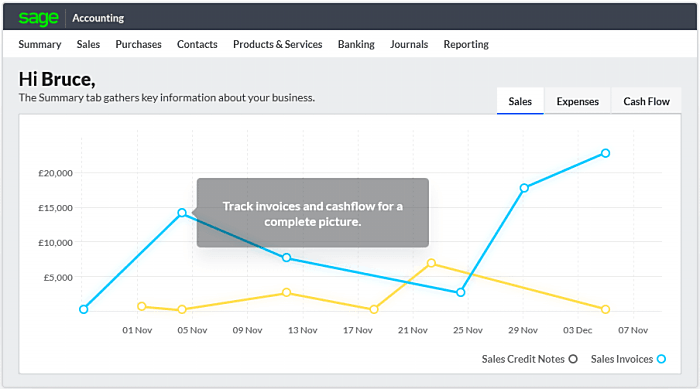
This tool allows you to analyze your finance, as well as invoice your clients upon project completion.
Other efficient apps you can use to handle project Finance & Accounting include Fyle, Quickbooks, Wave Accounting, and Freshbooks.
💡 For more great apps, check out our list of the best finance & accounting tools.
Project Management Techniques and Best Practices
So, you understand how popular project management methodologies work, when you should use them, and with what tools. Now, it’s time to highlight a few best practices in project management that help make your efforts in project management really efficient:
1. Document all project requirements
You’ve figured out what goals you want to accomplish and what tasks and steps you need to undertake to reach the said goals.
Now, it’s time to document this data for future reference, both for the sake of your team, and the sake of potential future project investors.
2. Estimate projects in accordance with your other obligations
Your company will likely work on several projects during the same time period.
So, you’ll need to consider your teams’ other projects and obligations when setting deadlines and defining responsibilities.
3. Manage the workload carefully
Are you sure you have allocated tasks, roles, and responsibilities equally?
Or does one of your team members frequently end up overworked because they work on 5 different tasks while other team members barely have anything to do?
Keep a close eye on this, and distribute work equally, for the best resource use.
4. Monitor project progress at all times
Is the project progressing as planned?
Is everyone doing their share of the work?
Is the team working at a pace that aligns with the expected project deadlines?
Is there a hold-up in one phase of the project?
Monitoring your team’s work and tracking their progress will help answer all this, and prevent mishaps and delays.
5. Communicate everything
To stay on track with what everyone is currently working on, how well they are progressing, and whether there are problems with the project, your team will need to communicate.
So, for every question, problem, or dilemma you have, talk about it. Answer the questions, figure out the problems, and solve the dilemmas together.
6. Take precautions against project scope creep
If you plan your project carefully and anticipate all the tasks and subtasks you may need to tackle before project completion, you’ll be secured against scope creep.
To do so, carefully calculate the budget and time you’ll need to finish all tasks and subtasks on time, and with the expected quality.
7. Consider all project risks
Each project has potential problems that may arise before project completion. We brushed against this subject with the Risk Register Technique earlier, now it’s time to emphasize its importance.
The trick to making sure you painlessly cruise past these problems lies in anticipating the problems before they happen.
So, aim to use your experience to define potential problems with project stages and tasks.
Then, define the solutions you’ll implement if the need arises.
8. Take the time to analyze the project after completion
Once you’re done with the project, take the time to analyze it.
Highlight what you did well, and what you could do better in the future.
Analyze the time it took to finish each stage and single out the tasks that took the most effort. You’ll want to allocate more time to such tasks in future projects.
And, of course, commend the team for their hard work and dedication. They’ve earned it.
Wrapping up…
Before you start working on a project, think about the best Project Management Methodology you can use for your work. Then, combine your chosen PM Technique with the right tools and best practices, for enhanced results.
If you follow the prescribed principles of the selected Project Management Technique, you’ll speed up your workflow, maintain control over project procedures, and streamline your management process. As a result, you’ll finish faster and turn over a high-quality end product.
References
- https://www.pmi.org/learning/library/project-management-techniques-determination-10335
- https://www.projectsmart.co.uk/brief-history-of-project-management.php
- https://en.wikipedia.org/wiki/Kanban#Origins
- https://www.hindawi.com/journals/complexity/2018/4891286/
- https://en.wikipedia.org/wiki/Program_evaluation_and_review_technique#History
- https://yourbusiness.azcentral.com/history-critical-path-method-24351.html
- https://en.wikipedia.org/wiki/Critical_chain_project_management#Origins
- https://en.wikipedia.org/wiki/Extreme_project_management
- https://en.wikipedia.org/wiki/PRINCE2#Seven_Principles
- https://en.wikipedia.org/wiki/PRINCE2#History
- https://www-scf.usc.edu/~csci201/lectures/Lecture11/royce1970.pdf
- https://static.aminer.org/pdf/PDF/000/361/405/software_requirements_are_they_really_a_problem.pdf
- https://www.informit.com/articles/article.aspx?p=169549&seqNum=5
- https://agilemanifesto.org/history.html
- https://ullizee.files.wordpress.com/2013/01/takeuchi-and-onaka-the-new-new-product-development-game.pdf
- https://en.wikipedia.org/wiki/Extreme_programming#History
Article written by Marija Kojic 11th May 2023